
How to work with charts/fit motifs into your design
I’m not really going to tell anyone how to design, if you’re creative you find your own process and everyone is different. If you are curious though, I am going to take the mystery out of how to put motifs and borders onto your designs whether they be your own motifs or ones chosen from books for your personal use only. Watch this space as I fill it up step by step with my Celtic Hat Project.
I've been asked by a friend to knit a hat I had knitted for my partner about 6yrs ago for her 2yr old son in a combination of orange, greens and brown.
She wanted the same style which is a simple square like this:

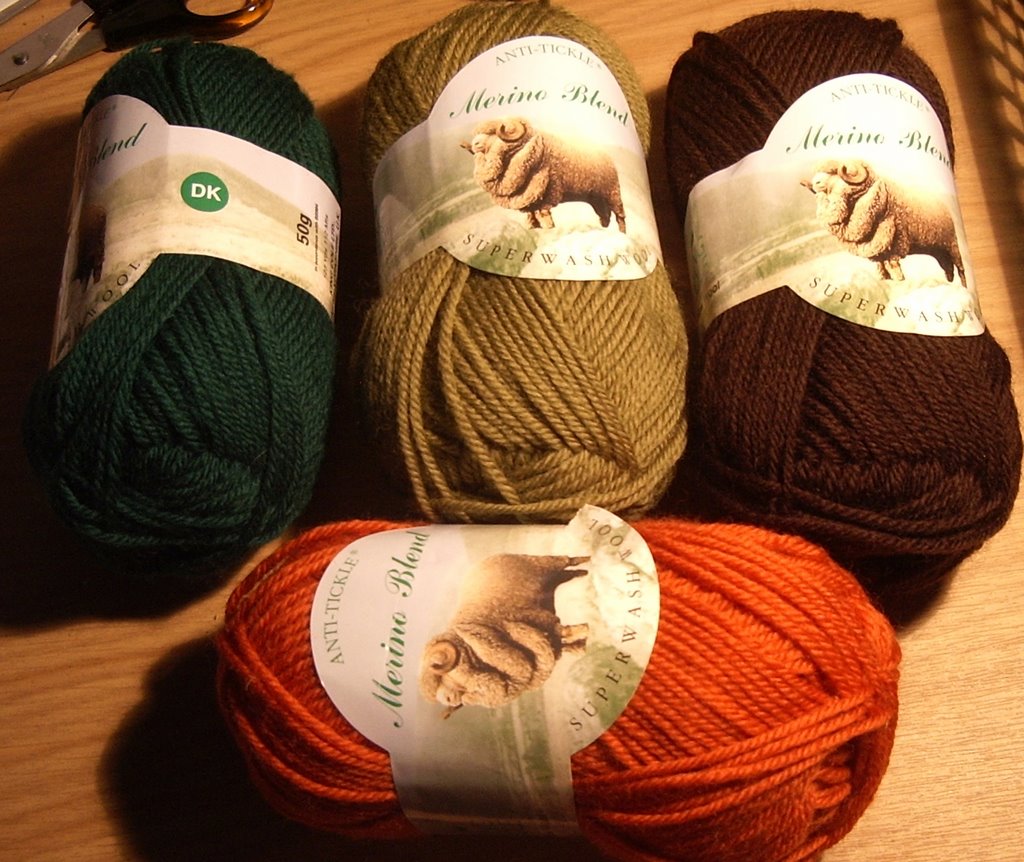
I knew which colours I was looking for and I knew that to get the amount of detail required for motifs, the knit was going to be of a fine gauge. After searching the Internet, I opted for a good anti tickle Merino because of the reasonable cost

I knitted a swatch for gauge rather than testing a motif. I wanted knitted a dk yarn on 3mm needles and chose a strongly contrasting but small Celtic plait
Size I used a table of standard measurements
and deduced that a 2yr old’s head is going to be about 18 inches. When knitting for children the biggest errors are made by knitting too small so I know I will have to be careful not to make the Fairisle so tight that it restricts the size.
Gauge I measured my swatch and found that I had 28 sts and 30 rows per 4ins2, this means I have 28÷4 = 7sts per inch
To make sure that I have the right number of stitches for a 2 yr old,
7x18=126 sts
I chose a small Celtic plait for the swatch which has an 8 stitch repeat which conveniently fits into 126, 15 times with a few stitches left over. As I would still be ok with a bit of wear allowance in the hat, I am happy to add a few stitches to make the Celtic plait fit, at a later stage I might plot the hat out on an excel chart and fit the individual Ravens motifs evenly spaced out around the hat
Therefore I will adjust the hat as follows
Head circumference = 128 sts
(18 ¼ins)
I also worked out that there are 30÷4 = 7.5 rows per inch
So I know that my Celtic plait will be 9 rows high which would be
9÷7.5 = 1.2 i.e. 1 ¼ ins. I plan to have a stocking stitch roll brim which takes up about 12 rows so my hat design has been set up to
21 rows = 21÷7.5 = 2.8 i.e. nearly 3ins. I want the hat to be just under 9ins for a square design. So I have about 6 ins left to
fill and I know the Ravens take up 20 rows in height which is 20÷7.5 = 2.6 so nearly 3 inches. This leaves about 3 inches at the top where I might fit a very small repeating border or line of stitches as the top of the hat is designed to be tied up anyway.
Fairisle Charts
In the past I have sketched out a plan on graph p
aper and then put boxes in where the motif pattern is to be applied by referring to a chart. However, I am very interested in being able to repeat hats like this so for the first time, I am going to teach myself to put it onto an Excel chart. I have done a chart before but haven’t worked out how to put repeats and mirror images of colour motifs. Watch this space to find out how I do……………………………………………………..
My notes in the Design Journal
I might not carry the information in my head if I have several for projects on the go, it makes sense to write everything down h
owever trivial it seems.
I jotted down some basic notes about measurements and my maths as follows.
Size I used a table of standard measurements and deduced that a 2yr old head is going to be about 18 inches. When knitting for children the biggest errors are made by knitting too small so I know I will have to be careful not to make the Fairisle so tight that it restricts the size.
Gauge I measured my swatch and found that I had 2
8 sts and 30 rows per 4ins2, this means I have 24÷4 = 6sts per inch
To make sure that I have the right number of stitches for a 2 yr old,
6x18=108 sts
I chose a small Celtic plait for the swatch which has an 8 stitch repeat which conveniently fits into 104, 13 times so there are a few stitches left over for the edge,
I will rpt the last 2 stitches of pattern at end and the first 2 sts from chart at beginning, then I can take the edges in and match the seam for a continuous pattern. I am a loose knitter, I know that if the hat measures just a little under 18 ins even with Fairisle it will stretch to way over that without any distortion of the pattern.
Later I will plot the hat out on an excel chart and fit the individual Ravens motifs evenly spaced out around the hat
Therefore the hat is: Head circumference = 108 (18ns)
I also worked out that there are 28÷4 = 7 rows per inch
Celtic plait will be 9 rows high with 3 rows space = 12 rows
Stocking stitch roll brim which takes up about 12 rows
I know the Ravens take up 22 with 3 rows either side = 28 rows
Total height of hat so far = 52 rows÷7 = 7.42 i.e. 7 ¾ ins before brim is rolled
I want the hat to be about 9ins after brim has rolled for an approx square design which means only about 6 or so rows left at the top, no room for the flowery border so I will insert a small diagonal striped border instead.
Fairisle Charts
In the past I have sketched out a plan on graph paper and then put boxes in where the motif pattern is to be applied by referring to a chart. However, I am very interested in being able to repeat hats like this, especially when they are my own motifs although the motifs here are taken from Enchanted Knitting. So for the first time, I am going to teach myself to put it onto an XL chart so that I can work from it. I have done a chart like this before but haven’t worked out how to put repeats and mirror images of colour motifs. Watch this space to find out how I do……………………………………………………..
Well, I've spent a long time using XL and teaching myself how to make knitting charts in this format. I did briefly try other pieces of demo software for stitch design but really I found the freedom of a blank worksheet in XL much more satisfying. The Anticraft crew assured me this was they did it too and they are much better at it than me. I'm just sorry I can't load this particular chart for you, but this is how I did it.
How did I do it? I roughly worked out that I would need 104 columns (stitches) and roughly about 60 rows to work to my square hat pattern. You can put your 2sts of edge sts either side if you want to chart the whole 108 but I didn't do this.
I formatted the cells by selecting all of them and choosing to have a border around them and repeated this and chose a border on the inside, this marks out each stitch. Then I made the proportion for the stitch roughly, slightly wider than it is high. It is possible to work out the exact stitch proportion of your work and put this in but I just wanted to use it to make viewing and following the chart easier.
Then I took the first 12 row, 9row Celtic Plait, 3 row space section, the orange one and selected that whole area and used the drawing toolbar/ fill in option to fill in the whole section as orange.
Next, using my Celtic plait border that had an eight stitch repeat and the 8 stitches and 9 rows on the right hand side of the chart 4th row from the top I filled each cell just as it was in the pattern in brown, just as I had filled in the orange. I didn't need to laboriously repeat this like I would with pencil and graph paper. I just selected the 8x9 section of the Celtic chain and pasted it in again and again right next to the previous section so that it went across the whole of the hat. To make things even easier, I just filled in 8 st rpt, then copied these 8 to make 16, then copied first 16 and pasted into next 16, then copied whole 32 and copied into next 32 until my chart was filled.
I repeated this method until I had completed the whole layout for the hat. If you have a motif like the Ravens, they need to be evenly spaced so I worked out where to place them with an even number of stitches between each one. In XL you can insert columns between motifs in just that section, or you can move them by selecting the cells of the motif, copying or cutting them and pasting them elsewhere and then doing a little tidying up by making sure the area you 'cut' or 'copied' them from has the correct filled colours. If you didn’t like where you had put your motifs, but then wanted to clear the area to try again do this:
First, select a new area (big enough to put the part of design on that you want changing) outside your chart and format the cells with the same row and column width as your chart.
Next, select the cells on the chart you wish to clear
Next, copy those cells and paste them onto your new area of chart
Next, provided you are happy you have a good copy of the motif or repeat needed, select motif on chart again and cut.
Next, where you have cut out motif, insert cells as necessary and colour the whole area/background by filling the cells with appropriate colour.
Next, you are ready to start again by copying the motif from the bottom and then pasting it on to the chart against the background where you want it to appear.
If you want to be really organised, you can make up a chart of background colours and then make a separate area with individual motifs and copy them over to the chart to try, if you like it keep it, if not delete it.
Select motifs cells, choose copy, then select an are
I usually make sure that my stitch proportion is slightly wider than it is tall adjusting in format rows and format columns and play around with width and height to make sure I can view the chart easily and fit it on a page landscape when printing.
The only thing I didn't master was the ability to produce a mirror image of my motifs. For this particular project I have taken motifs from a source book but now I have mastered being able to fill in the charts quite quickly, I will draw some of my own large charts. I am already putting on my various skulls and other small motifs that are completely my own for design submissions coming up.
The Actual Knit.............................................
I have started knitting the hat following the chart although as long as I have the borders somewhere, I can actually knit up designs like this without a final chart and visualise the placement of motifs in my head.
Finally.....
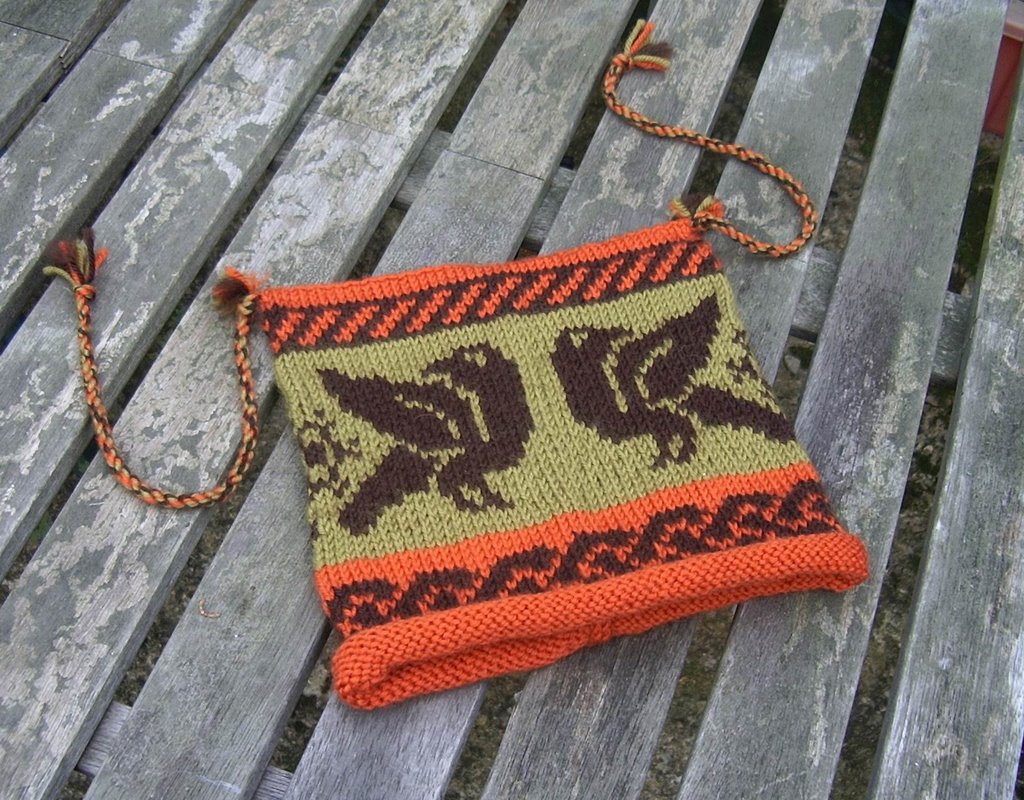
I've knitted up the hat, just got to join it. It is blocking at this very moment, I hope my 2yr old recipient is happy with it. I will post a pic of it when finished.
The final piece:
My appraisal, I quite like the fact I used more than two colours. I was disappointed I couldn;t squeeze in some plant life as well but this is for a 2yr old so space is limited The faithful Enchanted Knitting Charts helped me out once again. however, I am itching to go back to my own charts/designs but which one do I do first?


No comments:
Post a Comment