Welcome to Erssie Knits

To see my new website, and find patterns to download and more go here to the Erssie Knits website

Knitting Squares and Other Shapes in The Round
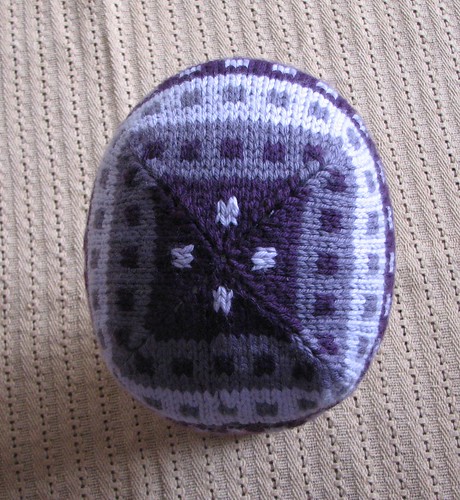

There was a Ravelry post from a lady who was knitting a square shawl in the round, her own design, but had no idea how to draw this in a chart form.
I answered her post on that forum with a few little examples of my own of shapes.

Basically, to knit in the round, you need to break it down into segments.
So, if you want to knit from a central point outwards, or you want to knit from the outer edge inwards to produce a flat shape you are going to end up with 4 segments.

These segments look like triangles on a chart. Here is a very simple chart for a square but normally, you would start with the 8 stitches around the central stitch, or stop at 8 stitches and thread yarn through and pull tight. However, to help you design a chart, it is best laid out like this so you can see the mitred lines going across the cen

The sides of each triangle is where your double decrease will be happening i.e. where you see the squares. For a mitred square, you need to butt up right to the edge and do decreases leaning into each other.

Normally, on a triangular shape e.g. a raglan sweater you would do an SSK (slip 1 K wise, slip 1 K-wise, knit both slipped sts together) to make a left leaning line at the very beginning of the edge on the right edge, or a K2tog (knit 2 together) at the other end for a right leaning decrease at the left edge of the shape

However, when triangles are assembled as a square, as in these hats I like to make my edges lean into the edge of the adjacent segment. So like these hats, I started each segment with an SSK and finished each segment with a K2tog...and I liked the result better.


If you are knitting a traditional Tam, then those grey lines would be your centred double decreases (should be 7 in triangles in all for a Tam) and you would slip 2 knitwise, knit 1, then pass both slipped stitches over the knitted stitch. abbreviated as
sl2, k1, p2sso (or S2KP2) – centered double decrease.

Obviously, if you are knitting a square or circular shawl in the round, you might start from the centre and along the edges increase by placing a YO on the edge of each triangular segment. A lot of traditional square shawls are knitted this way.

Simple Lace Square Shawl with Paisley and Scalloped edge from Wise Needle/Stringornothing.com


So how can you chart something like this, which has segments joining around and motifs on different planes? What a nightmare to design??? Not really though, if you just break it down to one triangle and then repeat across the round 4 times for a square.

What do you do if you want a different design on each segment, and you want to see how it looks? Then you just use your blank chart, fill it in for each triangle. Then, to help you read it to knit them, you could put all your triangles in line, and knit across them from right to left.

Now this way of charting to design, rather than charting to publish, is a good visual aid not only for squares but for other shapes too. Remember, that for every line of decrease you have, you will have the same number of sides. So, if you have 4 lines of decrease as shown in my charted example, then you are going to get 4 sides to your shape. Same also applies to number of segments of course.
4 triangles = 4 sides to the shape you knit in the round.

What about a circle? You might be surprised to learn that knitting in the round does not produce a perfect circle at all. So the traditional Tam, which has double decreases arranged along 7 lines, produces a shape that when you examine closely, actually has 7 sides so is a heptogram. The eye is fooled (when there are lots of short narrow segments) into thinking that it is producing a wheel or a perfect circle, which is not the case although we can block it until it looks circular.


So, if you had 6 lines of decrease you would get a hexagon, which is what Woolly used in her Hex hat for both the knitted and crocheted version where the hexagons were joined together to make a whole hat.


Here is a blank chart that I often use for Tam designing on paper, just wish I had the time to knit up the designs too! I would start a Tam design by drawing a circle, then dividing my circle into 7 segments, sketching a design across the segments, either separate motifs for each one, or perhaps something that is continuous across the whole 'circle'. Then, I would go to the blank chart and chart that design onto one segment, and literally repeat it throughout. If I want any sections to be different (provided I can carry the yarns there), then I would just draw up another segment chart for that section.


More Knitting History.......

My knitting story of my grandmother and her great grandmother and being forced to knit in a children's home has been added to the V&A website. Go there to read other people's learning to knit stories too. |Mine I already put up on this blog, see a couple of posts below. My story was quite personal and difficult. It is not something our family would have admitted to 20 yrs ago. It all makes us who we are though!


More Crochet
How to make these crochet baskets


Download a PDF of this pattern from here


I experimented a little more with some old skills, and once I got back into doing things I remembered the things I used to make as a kid. I used to love making spirals, and used to litter our house with brightly coloured rough looking coasters!

I made these baskets above because for ages I had been using an old, accidentally felted cabled hat upside down as a basket in the bathroom and it was amazing to see how quickly the sunlight made yellow marks in it! So I needed a new bigger basket to fit my necklaces, earrings, hair slides and girlie junk in the bathroom.


Anyway, for anyone who wants to make a spiral (as seen as the bottom which was the start of this crochet basket) this is my preferred method.
For a 2 colour spiral.

Use a tapestry crochet technique throughout, i.e. working stitches tightly, carrying unused yarn and yarn tails along the top edge of work and making dc's around it so that they are hidden

Large Basket
Materials
4 x 50g Chunky Wool (shown here is Texere chunky)
A: Bright Pink
B: Bright Aqua
C: Green
D: Purple
1 3.5mm hook

Gauge
Not essential, but make sure you use a much much smaller hook to get tight tension and a stiff basket. I used chunky for a normal knitting needle size of around 6mm, but my hook was 3mm.

Bottom

Two Colour Spiral

1. With Yarn A, make a slip knot, but unlike your slipknot that pulls in or expands easily when pulling the working yarn, make sure that your slipknot is adjustable by pulling the tail of the yarn

2. Using the working end of yarn A, make 1 chain (to count as 1 dc) and 2 dc into the slipknot ring (3dc)


3. Using yarn B, make 1 chain (to count as 1 dc) and 2 dc into the slipknot ring made from yarn A (3dc)


4. Pick up yarn A again and make 2 dc into the top of each of the 3 dc of yarn B that you made into the ring (6dc)


5. Pick up yarn B and make 2 dc into the top of each of the 3 dc of yarn A that you made into the ring (6dc)


One rnd is complete, and there should be a total of 12 dc, half in colour A and half in the other colour B.


Now pull the tail of yarn A, from the original slipknot, and tighten the ring in the middle to make the stitches snug.


You are now ready to continue working in a spiral. Work half the rnd in A, remove your hook and complete the other half of the rnd in B always making sure you are going in the same direction.
Clever eh? So simple, and so effective.

I used 2 colours in this way to make the bottom of the larger basket, so you need to use the same rules as you would for crocheting circles:

Increases
In the first rnd I worked 2 dc in each stitch
Next rnd 1 dc in next st, 2dc in next st
Next rnd 1dc in each of next 2 dc, 2 dc in next st
Continue to increase in this way, putting one more dc in between each of the decrease dc's on each rnd until the basket bottom was the diameter I wished it to be.


Main Body of Basket
Make sure that you have a multiple of 12 sts to fit in these motifs, either stop at correct point, or you could increase or decrease a few sts on last rnd of bottom to fit
I started to work in the opposite direction, this was so that the right side of the bottom is on the inside of the basket, and the RS of the sides is shown on the outside.

Working in back loops only (this helps to shape the motifs used later) I worked in straight rnds, of 1 dc in every dc using tapestry crochet motifs and outer circle starts to curl and then you are working in even rnds in a tube shape for the top of the basket.


Hounds Tooth Motif Band


Still working back loops only and 1 dc in each dc:
Rnd 1: 1dc in ev dc using Yarn B
Rnd 2: *3dc Yarn B, 1 dc Yarn D, rep from * to end of rnd
Rnd 3: 2dc Yarn B, *3dc Yarn D, 1dc Yarn B rep from * to last 2dc, 2dc Yarn D
Rnd 4: As rnd 2
Rnd 5: As rnd 1


Plain rnd
Still working back loops only and 1 dc in each dc:
2 rnds in Yarn C (green)

Diagonal Motifs Band


Still working back loops only and 1 dc in each dc:
Rnd 1: 1dc in ev dc using Yarn B
Rnd 2: 2dc Yarn D, 2dc Yarn B rep from * to end
Rnd 3: 1 dc Yarn D, 2 dc Yarn B, 2 dc Yarn D rep to last 3dc, 2 dc Yarn B, 1 dc Yarn D
Rnd 4: 2 dc in Yarn B, 2 dc in yarn D to end of rnd
Rnd 5: As rnd 1

Plain rnd
Still working back loops only and 1 dc in each dc:
2 rnds in Yarn C (green)

Fasten off.
Finish edge using Crab Stitch as explained below.

Small Basket
Materials
Small amounts of
Yarn A
Yarn B
Yarn C

Gauge
Not essential, but work tightly as for Large Basket

Bottom: 3 Coloured Spiral


I joined together 3 colours as a spiral, exactly as explained above
I had yarns A, B, and C making an initial 3dc each into the slipknot of yarn A, then made dc's into the next yarns in sequence, so

A worked 3dc into B,
B worked 3 dc into C,
and C worked 3 dc into A.
All travelling in the same direction and working in a spiral.

Continue to work all 3 yarns by making a dc in next dc's for a few sts, then removing hook and working another section. This will make a cylinder shape with stripes spiralling around to the top.

For this smaller pot, I stopped making a circle on 4th rnd, and then just worked one dc into every dc for the top part of the basket, finishing with yarn D.

Fasten off when required height.

Crab Stitch Edging


You can find a tutorial here
To finish off the baskets, I used good old fashioned crab stitch. I attached a contrast coloured yarn, here I used Yarn B.
This stitch doesn't so much go sideways as completely backwards.
Pull the hook with a loop on, into the stitch behind the current stitch i.e. backwards, then pull another loop through, and pull up 2 loops and pull the yarn through these 2 loops, and then work backwards again....repeating this sort of gives a cross between a blanket stitch edge or a picot edge in look, you can see where your 2 final loops get pulled around the edge of the basket.

Fasten off, and wrap last bit of yarn around the edge of last stitch twice, secure and weave end on the inside.

How to Block Your Baskets


I washed them both in fairly hot water for a semi felt to stiffen the wool but as I wanted to keep the shape and size, whilst it was still damp and hot I put the large basket onto a flower pot, so it has taken the shape of the gradually widening bottom of the flower pot. I put the small basket around my Gaviscon bottle, it fitted perfectly. Both baskets went onto a radiator or in the airing cupboard near warm pipes to dry and when the 'molds' where removed, they had taken on the shape of them perfectly.

If you don't mind a fair amount of shrinkage, you could completely felt them but do remember to try and reshape whilst felting otherwise you could get a
shapeless mess.


My Own Bit of Knitting History....


I learned to knit from my Mum, she learned to knit from her own Mum. Nothing unusual about that.


Once, when my mother was a teenager, she asked her own mother (my grandmother) why on earth she was so quick at knitting and did not need to look at what she was doing. Her fingers used to move in a blur and she didn't once have to look at them, and she taught her daughter to do the same and hence this ability to knit without looking passed on to me, but I don't have the speed.


Her reply was, that her own mother (my great grandmother) having had 13 children and losing a husband at a young age, could not afford to keep the girls so the boys went out to work but the girls went into a children's home to be looked after and fed properly until such time as my grandmother could afford to release them. They had a visit once a week from their mother, who always brought a cake which was confiscated after she had left them and was assured the girls had a wonderful time there, which was not the case at all.


On her visits and prior to her visits, she had taught the girls to knit but my grandmother was the eldest and hence the fastest. Each child in the home was given an almost impossible knitting quota from age 4 upwards, much of it to go to the WWI Front and the boys fighting there, or for babywear for the newly admitted orphans each week. And they had to reach this quota or they were beaten and told that they were lazy and locked in a dark cupboard for hours on end with no food. My grandmother quickly made friends with the girl in the bed next to her, who having a weak heart and claustrophobia died in the cupboard after not meeting her knitting quota. This put great fear into all my great aunts and especially my grandmother who felt responsible for them and had made a promise to my great grandmother that she would allow no harm to come to them.


After that awful event, my grandmother was in fear of her younger sisters (there were about 7 of them) not being able to meet the quota, so she secretly took their knitting on and used to knit under the bedclothes at night, in complete darkness purely by touch and in fear of being caught. She was so fast, she managed to keep the girls from being given the 'cupboard' punishment, which had been built up into such an awful event they truly believed it had the power to kill.


Eventually the boys became old enough to be able to get better jobs and look after the younger sisters, and my own grandmother became old enough to leave and marry. Anyway, the skills of knitting like lightening, and being able to knit in the dark, carried my grandmother through World War II as well and she was able to knit like crazy during long blackouts and being in bunkers whilst Plymouth took the worst bombing of any city in the whole of the UK (due to its having military bases and shipping docks).


This is my bit of history, which I wrote up for KatFlap
Pictures, many thanks to historical websites for sharing these, I don't have pics of the girls in the home, mainly because my family were far too poor to own a camera or have commercial pics taken.


Experiments in Tapestry Crochet

The Tools


Just for a change, I am working in crochet at the moment. I am not able to show you the pics although I am as excited as a complete beginner again with things I am doing for the first time. I.e. working with really tiny hooks, and doing motifs in tapestry crochet but with my new crochet hooks which are Clover soft touch hooks which have a flat and cushioned handle. Much easier for me to handle for tight small stitches.

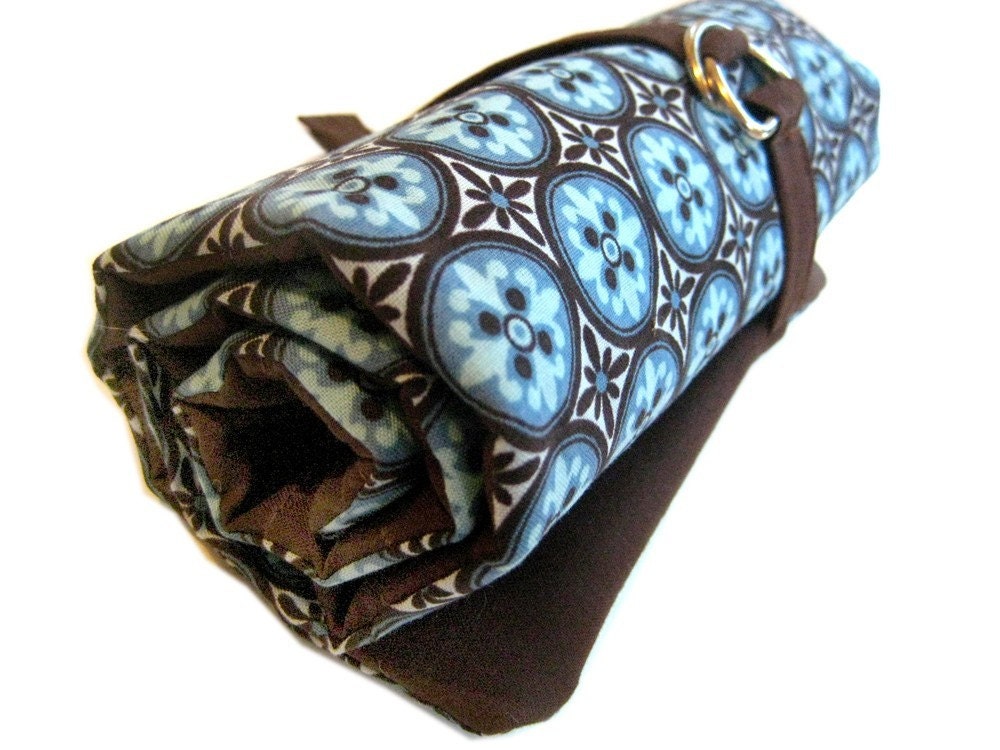
I also treated myself to a brand new case to keep them in. A lot of the fabric custom made dpn and hook cases, don't have a proper belt on and are ribbon only which frays terribly and becomes loose and the flaps usually move so it is always raining crochet hooks.

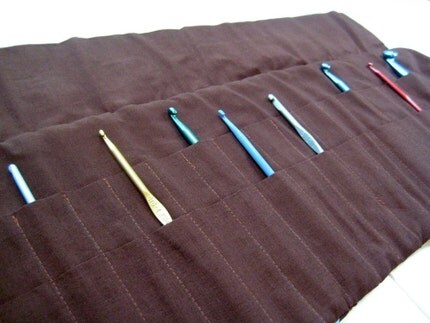
However, I invested in the above crochet rolls from Hi-Howareyou.com and they are wonderfully padded, with an angle flap that tucks in and a proper little belt!
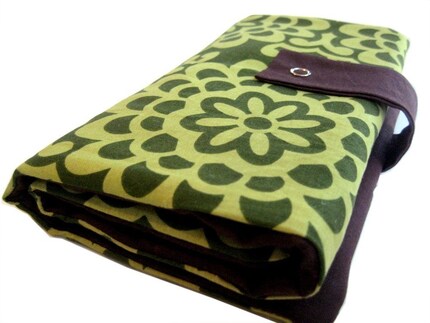
I chose the fabric you can see below on this needle case but on the crochet roll above.

I just love the way there are 30 wide slots, and each one is padded. I thoroughly recommend these, they are not the cheapest but they certainly are made well in a qullting style with batting. I would not recommend buying the one layer of fabric only kinds, as your hooks will slip out of the ends where the fold over flap moves. With this, there is little belt that closes the roll snugly too.


Colour work and graphing motifs

Now for some tips with colour work and tapestry crochet.

To slant or not to slant
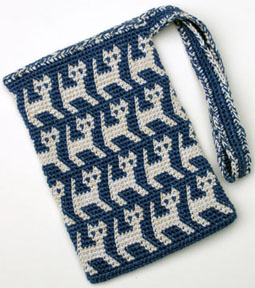
If you want to get a good outline and proportion to your motifs you can try crocheting your dc's (US sc's) into the back loop only, and on the RS only. This compensates for the normal 'slant' that you get. However, I like the slanted look that you get on some South American style and folk art pieces, for example look at these kitties on Carol Ventura's work, it would not look so traditional if it was not for the slant. See below for the graphs and a better explanation.


Normally this sort of crochet is done in the rnd, which means keeping to the RS only gives more even stitches and is a lot easier. If you are right handed you will be going around the piece clockwise and your motifs will slant to the right, if you are left handed then it is the opposite of this.

Changing yarns
How to handle colour changes. Now this appears to be tricky if you are a knitter, but actually it doesn't take long for the brain to click into the rhythm of this.
On your last stitch of the old colour, stop when half way through with 2 lps on the hook, and pull through a strand of the new colour. The yarn which is not being used, is carried along the top of the work and you crochet around it giving a good padding to the stitches. 2 colours is best, but really there is not limit provided you can cover them. See below though, for perfecting this technique for double sided pieces


Help my yarn shows through??

Problems can occur, where crochet people tell me that the yarn being carried peeps through their work so does not look like Carol's wonderfully smooth surfaces. Normally the reason for this is that the people have used crochet before, and have associated e.g. a 4mm hook with DK, 5mm with Aran/worsted etc.

Forget all of this, just use a hook that makes stitches so tight, it definitely covers up the carried yarns and cannot move about easily. I recently made a little item for one of my books coming out later this year, sorry I can't show it yet! I will try to make another piece and load it up here, I used DK yarn and a 2.25 mm hook....even a 2mm hook might have been better. Obviously you need to choose a yarn that does not split easily so try mercerised cotton to begin with before a fluffy wool.


My motifs are leaning to one side!!
The other problems were that some motifs had edges which looked stepped, and others worked because they had already been designed with the slant in mind....aaah what's going on here?

Well if you have a motif that has a diagonal line slanting right, and you are right handed then if you crochet through BOTH lps you get a stepped effect, but if you crochet under the BACK lp only, you get a clean diagonal line.

Lots of artisan style crochet uses diamonds, or zig-zags where normally you would use pointed triangular shapes. If you want to know what a motif is likely to come out as with the both loops slanting method, then use Carol's special graph paper which can be downloaded from her website, http://www.tapestrycrochet.com
The kitty looks like this for right handers, Carol has graph paper for left handers too.

Then to help you work more easily, you can translate it back to a normal graph like this. If working both loops, you can compensate a bit for the leaning effect if you make your motifs lean in the opposite direction...e.g. if you are right handed, then motifs lean right....so you would make your legs on the kitty, or other motifs lean left

Triangles and Zig zags
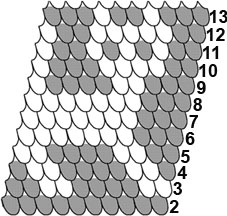
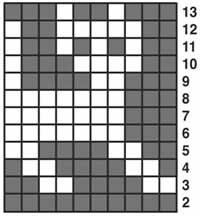
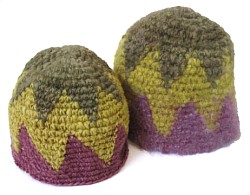
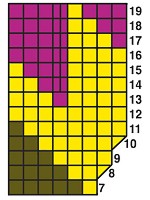
Carol has a free pattern on her site for these hats (or bowls if you turn it upside down) and those triangular shapes, come out on a graph slightly differently than you would expect.

See how the triangle sides, have actually been worked in a straight line?

Work with it....not against it.
I just love the way that 'problems' are not things to be solved with artisan or folk art, and that it is the little anomalies that they work with to make traditional items that I love. I am more and more moving towards simplicity in design and colour work.....that seems to be my strength. I cannot tell you how many HUNDREDS of graphed artwork I have ranging from little tiny Fair Isle motifs up to more complicated pictorial stuff and Celtic knots and traditional motifs from fabric and textiles thrown in. Later in the year I will be opening these to the public and am working with someone else who is sympathetic to my design and also can present the ideas the way I would like them to be in public.

How your stitches affect drape (i.e. is it stiff or bendy)
Anyway, back to tapestry crochet. As well as working out how motifs will play out, i.e. slanting if working both loops in the direction of your hand (R or L hand) and being more or less square and stacked as graph paper if worked through the back loops only this affects the gauge, and hence the drape of the fabric.

Back loops = a softer fabric that drapes well - use for garments like hats, gloves, blankets or cloths and graph as normal
Both Loops = a sturdy stiff fabric with little drape, use for solid garments like slippers or boots or felted items, or use for pots, bowls, solid hats etc.

A Double side to it
The other effect I love about tapestry crochet, is the way you can make a pattern on the outside that is repeated on the inside. This does work better with going under both loops though, unless you like to have 2 sides whose stitches look slightly different. However, your colour motifs should show as that on both sides.

Often when you start, you would be making something like a bag and I would honestly not worry about how you do colour changes as no-one is going to see the inside. However, when you are new to this, and you look on the WS of your work....what do you see? Normally a rough outline of motifs but Arrrghhhh there are little dashes of your background colour appearing on them. Why why why?

Well, this is because in tapestry crochet you are instructed in a pattern to drop one colour and pick up the other. Remember though, patterns are an outline to a design they are not always tutorials on every single aspect. When you knit, a pattern might say CO 60 sts....and it wouldn't always tell you how to cast on. Same goes for writing tapestry crochet patterns, the pattern itself may not have the instructions for detail but the pattern notes might, and then a tech editor or magazine editor may cut that bit if there mag or book holds a technique section...or they may decide it is too obvious for their average reader.

Ok, I like obvious, and I totally understand the reasons why beginners need obvious! If you want to make sure you change yarns smoothly and leave no little blips and dashes behind then try this:

Say you are working with 2 yarns, Yarn A is your background and Yarn B is your motif.

1. On last dc before colour change,i.e. on the graph square just before the beginning of motif, pull Yarn A through as normal so there are 2 lps on hook.
Yarn B and any tail ends of other joinings, will be at front of work so as normal means putting hook under Yarn B & through the loop of dc, pick up yarn A pull back through lp and under Yarn B leaving 2 loops on hook
STOP for a second

2. Now pick up yarn A in your hand, and pull to front of work over the top of Yarn B, so that yarn A is now lying at front of work, and take Yarn B your new colour under yarn A so it is now lying along top of work ready to be picked up.

3. With hook (that stilll has 2 lps of yarn A) pick up yarn B and work a dc in next dc

STOP

4. Before continuing, have a look at the back of the work, you should see a completed stitch in your old colour Yarn A with no B visible there whatsoever, but the chain of the new colour is now over the top of the stitch of the new colour, colours should not be mingling on the same stitches.

5, One dc in next dc, with yarn B, you will see the black loop of the last stitch you made was actually the chain lying across the new stitch, so the last loop must ALWAYS match the colour of your next stitch.

Sounds complicated, but honestly this is easy.

Lastly, Tapestry crochet worked flat
Most crochet people seem to want to get the same smooth effect on one side, and they either swap hands and literally crochet backwards, or have developed a way of working backwards. Personally, I find this very difficult and have been cutting my yarns at the end of each row. This is mainly because I am not able to twist my wrist and cannot use my left hand for grippin anything.

One day i will make a video of these of my own, but do go to my YouTube channel which is slowly growing and has a vid tutorial from Carol Ventura on this technique plus others like Crafty Andy.

I thoroughly recommend Carol's website, http://www.tapestrycrochet.com
go there to see more of her videos showing tapestry flat, and in the rnd as well as links to her free patterns and opportunities to buy he wonderful books.