
Knitting Squares and Other Shapes in The Round
 There was a Ravelry post from a lady who was knitting a square shawl in the round, her own design, but had no idea how to draw this in a chart form.
I answered her post on that forum with a few little examples of my own of shapes.
Basically, to knit in the round, you need to break it down into segments.
So, if you want to knit from a central point outwards, or you want to knit from the outer edge inwards to produce a flat shape you are going to end up with 4 segments.
These segments look like triangles on a chart. Here is a very simple chart for a square but normally, you would start with the 8 stitches around the central stitch, or stop at 8 stitches and thread yarn through and pull tight. However, to help you design a chart, it is best laid out like this so you can see the mitred lines going across the cen
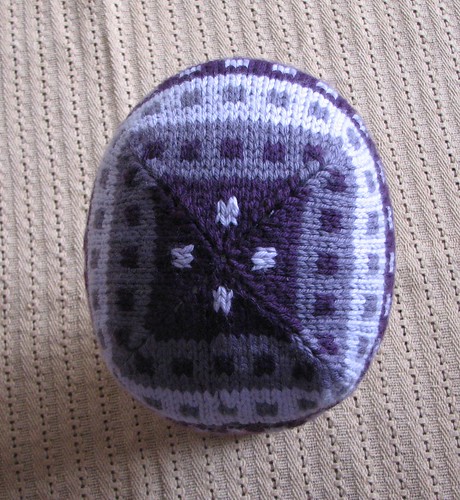
 The sides of each triangle is where your double decrease will be happening i.e. where you see the squares. For a mitred square, you need to butt up right to the edge and do decreases leaning into each other.
Normally, on a triangular shape e.g. a raglan sweater you would do an SSK (slip 1 K wise, slip 1 K-wise, knit both slipped sts together) to make a left leaning line at the very beginning of the edge on the right edge, or a K2tog (knit 2 together) at the other end for a right leaning decrease at the left edge of the shape
However, when triangles are assembled as a square, as in these hats I like to make my edges lean into the edge of the adjacent segment. So like these hats, I started each segment with an SSK and finished each segment with a K2tog...and I liked the result better.

If you are knitting a traditional Tam, then those grey lines would be your centred double decreases (should be 7 in triangles in all for a Tam) and you would slip 2 knitwise, knit 1, then pass both slipped stitches over the knitted stitch. abbreviated as sl2, k1, p2sso (or S2KP2) – centered double decrease.
Obviously, if you are knitting a square or circular shawl in the round, you might start from the centre and along the edges increase by placing a YO on the edge of each triangular segment. A lot of traditional square shawls are knitted this way.
 Simple Lace Square Shawl with Paisley and Scalloped edge from Wise Needle/Stringornothing.com
So how can you chart something like this, which has segments joining around and motifs on different planes? What a nightmare to design??? Not really though, if you just break it down to one triangle and then repeat across the round 4 times for a square.
What do you do if you want a different design on each segment, and you want to see how it looks? Then you just use your blank chart, fill it in for each triangle. Then, to help you read it to knit them, you could put all your triangles in line, and knit across them from right to left.
 Now this way of charting to design, rather than charting to publish, is a good visual aid not only for squares but for other shapes too. Remember, that for every line of decrease you have, you will have the same number of sides. So, if you have 4 lines of decrease as shown in my charted example, then you are going to get 4 sides to your shape. Same also applies to number of segments of course.
4 triangles = 4 sides to the shape you knit in the round.
What about a circle? You might be surprised to learn that knitting in the round does not produce a perfect circle at all. So the traditional Tam, which has double decreases arranged along 7 lines, produces a shape that when you examine closely, actually has 7 sides so is a heptogram. The eye is fooled (when there are lots of short narrow segments) into thinking that it is producing a wheel or a perfect circle, which is not the case although we can block it until it looks circular.

So, if you had 6 lines of decrease you would get a hexagon, which is what Woolly used in her Hex hat for both the knitted and crocheted version where the hexagons were joined together to make a whole hat.
Here is a blank chart that I often use for Tam designing on paper, just wish I had the time to knit up the designs too! I would start a Tam design by drawing a circle, then dividing my circle into 7 segments, sketching a design across the segments, either separate motifs for each one, or perhaps something that is continuous across the whole 'circle'. Then, I would go to the blank chart and chart that design onto one segment, and literally repeat it throughout. If I want any sections to be different (provided I can carry the yarns there), then I would just draw up another segment chart for that section.
Basically, to knit in the round, you need to break it down into segments.
So, if you want to knit from a central point outwards, or you want to knit from the outer edge inwards to produce a flat shape you are going to end up with 4 segments.
These segments look like triangles on a chart. Here is a very simple chart for a square but normally, you would start with the 8 stitches around the central stitch, or stop at 8 stitches and thread yarn through and pull tight. However, to help you design a chart, it is best laid out like this so you can see the mitred lines going across the cen
The sides of each triangle is where your double decrease will be happening i.e. where you see the squares. For a mitred square, you need to butt up right to the edge and do decreases leaning into each other.Normally, on a triangular shape e.g. a raglan sweater you would do an SSK (slip 1 K wise, slip 1 K-wise, knit both slipped sts together) to make a left leaning line at the very beginning of the edge on the right edge, or a K2tog (knit 2 together) at the other end for a right leaning decrease at the left edge of the shape
However, when triangles are assembled as a square, as in these hats I like to make my edges lean into the edge of the adjacent segment. So like these hats, I started each segment with an SSK and finished each segment with a K2tog...and I liked the result better.
If you are knitting a traditional Tam, then those grey lines would be your centred double decreases (should be 7 in triangles in all for a Tam) and you would slip 2 knitwise, knit 1, then pass both slipped stitches over the knitted stitch. abbreviated as sl2, k1, p2sso (or S2KP2) – centered double decrease.
Obviously, if you are knitting a square or circular shawl in the round, you might start from the centre and along the edges increase by placing a YO on the edge of each triangular segment. A lot of traditional square shawls are knitted this way.
Simple Lace Square Shawl with Paisley and Scalloped edge from Wise Needle/Stringornothing.comSo how can you chart something like this, which has segments joining around and motifs on different planes? What a nightmare to design??? Not really though, if you just break it down to one triangle and then repeat across the round 4 times for a square.
What do you do if you want a different design on each segment, and you want to see how it looks? Then you just use your blank chart, fill it in for each triangle. Then, to help you read it to knit them, you could put all your triangles in line, and knit across them from right to left.
Now this way of charting to design, rather than charting to publish, is a good visual aid not only for squares but for other shapes too. Remember, that for every line of decrease you have, you will have the same number of sides. So, if you have 4 lines of decrease as shown in my charted example, then you are going to get 4 sides to your shape. Same also applies to number of segments of course.4 triangles = 4 sides to the shape you knit in the round.
What about a circle? You might be surprised to learn that knitting in the round does not produce a perfect circle at all. So the traditional Tam, which has double decreases arranged along 7 lines, produces a shape that when you examine closely, actually has 7 sides so is a heptogram. The eye is fooled (when there are lots of short narrow segments) into thinking that it is producing a wheel or a perfect circle, which is not the case although we can block it until it looks circular.
So, if you had 6 lines of decrease you would get a hexagon, which is what Woolly used in her Hex hat for both the knitted and crocheted version where the hexagons were joined together to make a whole hat.
Here is a blank chart that I often use for Tam designing on paper, just wish I had the time to knit up the designs too! I would start a Tam design by drawing a circle, then dividing my circle into 7 segments, sketching a design across the segments, either separate motifs for each one, or perhaps something that is continuous across the whole 'circle'. Then, I would go to the blank chart and chart that design onto one segment, and literally repeat it throughout. If I want any sections to be different (provided I can carry the yarns there), then I would just draw up another segment chart for that section.


1 comment:
It is obvious that you have studied this process at great length. Not everybody is able to share their knowledge so beautifully. Thanks for taking the time to share!
Post a Comment