
Experiments in Tapestry Crochet
The Tools

The Tools

Just for a change, I am working in crochet at the moment. I am not able to show you the pics although I am as excited as a complete beginner again with things I am doing for the first time. I.e. working with really tiny hooks, and doing motifs in tapestry crochet but with my new crochet hooks which are Clover soft touch hooks which have a flat and cushioned handle. Much easier for me to handle for tight small stitches.
 I also treated myself to a brand new case to keep them in. A lot of the fabric custom made dpn and hook cases, don't have a proper belt on and are ribbon only which frays terribly and becomes loose and the flaps usually move so it is always raining crochet hooks.
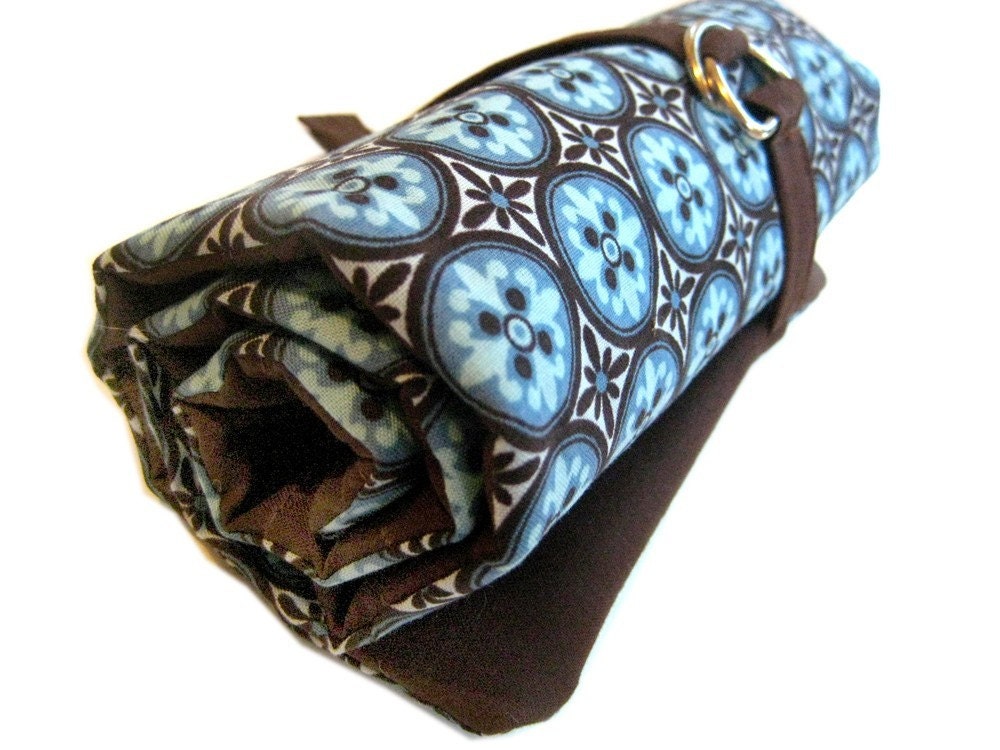
However, I invested in the above crochet rolls from Hi-Howareyou.com and they are wonderfully padded, with an angle flap that tucks in and a proper little belt!
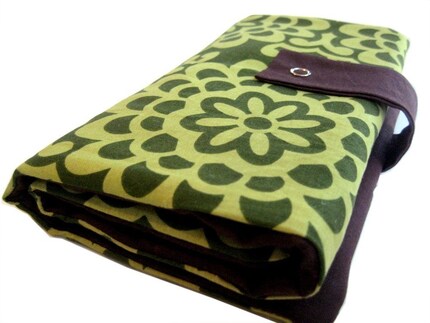
I chose the fabric you can see below on this needle case but on the crochet roll above.
I also treated myself to a brand new case to keep them in. A lot of the fabric custom made dpn and hook cases, don't have a proper belt on and are ribbon only which frays terribly and becomes loose and the flaps usually move so it is always raining crochet hooks.However, I invested in the above crochet rolls from Hi-Howareyou.com and they are wonderfully padded, with an angle flap that tucks in and a proper little belt!
I chose the fabric you can see below on this needle case but on the crochet roll above.
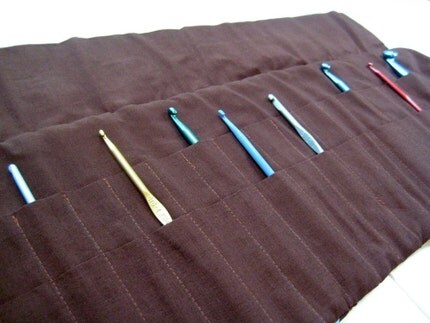
I just love the way there are 30 wide slots, and each one is padded. I thoroughly recommend these, they are not the cheapest but they certainly are made well in a qullting style with batting. I would not recommend buying the one layer of fabric only kinds, as your hooks will slip out of the ends where the fold over flap moves. With this, there is little belt that closes the roll snugly too.
To slant or not to slant
If you want to get a good outline and proportion to your motifs you can try crocheting your dc's (US sc's) into the back loop only, and on the RS only. This compensates for the normal 'slant' that you get. However, I like the slanted look that you get on some South American style and folk art pieces, for example look at these kitties on Carol Ventura's work, it would not look so traditional if it was not for the slant. See below for the graphs and a better explanation.
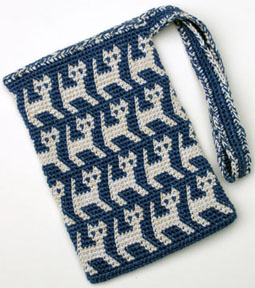 Normally this sort of crochet is done in the rnd, which means keeping to the RS only gives more even stitches and is a lot easier. If you are right handed you will be going around the piece clockwise and your motifs will slant to the right, if you are left handed then it is the opposite of this.
Changing yarns
How to handle colour changes. Now this appears to be tricky if you are a knitter, but actually it doesn't take long for the brain to click into the rhythm of this.
On your last stitch of the old colour, stop when half way through with 2 lps on the hook, and pull through a strand of the new colour. The yarn which is not being used, is carried along the top of the work and you crochet around it giving a good padding to the stitches. 2 colours is best, but really there is not limit provided you can cover them. See below though, for perfecting this technique for double sided pieces
Help my yarn shows through??
Problems can occur, where crochet people tell me that the yarn being carried peeps through their work so does not look like Carol's wonderfully smooth surfaces. Normally the reason for this is that the people have used crochet before, and have associated e.g. a 4mm hook with DK, 5mm with Aran/worsted etc.
Forget all of this, just use a hook that makes stitches so tight, it definitely covers up the carried yarns and cannot move about easily. I recently made a little item for one of my books coming out later this year, sorry I can't show it yet! I will try to make another piece and load it up here, I used DK yarn and a 2.25 mm hook....even a 2mm hook might have been better. Obviously you need to choose a yarn that does not split easily so try mercerised cotton to begin with before a fluffy wool.
My motifs are leaning to one side!!
The other problems were that some motifs had edges which looked stepped, and others worked because they had already been designed with the slant in mind....aaah what's going on here?
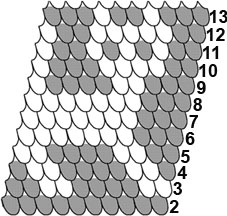
Well if you have a motif that has a diagonal line slanting right, and you are right handed then if you crochet through BOTH lps you get a stepped effect, but if you crochet under the BACK lp only, you get a clean diagonal line.
Lots of artisan style crochet uses diamonds, or zig-zags where normally you would use pointed triangular shapes. If you want to know what a motif is likely to come out as with the both loops slanting method, then use Carol's special graph paper which can be downloaded from her website, http://www.tapestrycrochet.com
The kitty looks like this for right handers, Carol has graph paper for left handers too.
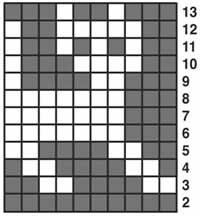
 Then to help you work more easily, you can translate it back to a normal graph like this. If working both loops, you can compensate a bit for the leaning effect if you make your motifs lean in the opposite direction...e.g. if you are right handed, then motifs lean right....so you would make your legs on the kitty, or other motifs lean left
 Triangles and Zig zags
Carol has a free pattern on her site for these hats (or bowls if you turn it upside down) and those triangular shapes, come out on a graph slightly differently than you would expect.
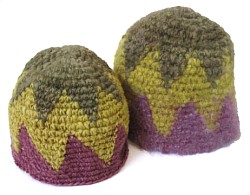
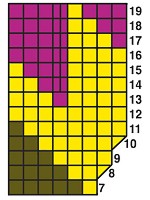
See how the triangle sides, have actually been worked in a straight line?
Work with it....not against it.
I just love the way that 'problems' are not things to be solved with artisan or folk art, and that it is the little anomalies that they work with to make traditional items that I love. I am more and more moving towards simplicity in design and colour work.....that seems to be my strength. I cannot tell you how many HUNDREDS of graphed artwork I have ranging from little tiny Fair Isle motifs up to more complicated pictorial stuff and Celtic knots and traditional motifs from fabric and textiles thrown in. Later in the year I will be opening these to the public and am working with someone else who is sympathetic to my design and also can present the ideas the way I would like them to be in public.
How your stitches affect drape (i.e. is it stiff or bendy)
Anyway, back to tapestry crochet. As well as working out how motifs will play out, i.e. slanting if working both loops in the direction of your hand (R or L hand) and being more or less square and stacked as graph paper if worked through the back loops only this affects the gauge, and hence the drape of the fabric.
Back loops = a softer fabric that drapes well - use for garments like hats, gloves, blankets or cloths and graph as normal
Both Loops = a sturdy stiff fabric with little drape, use for solid garments like slippers or boots or felted items, or use for pots, bowls, solid hats etc.
A Double side to it
The other effect I love about tapestry crochet, is the way you can make a pattern on the outside that is repeated on the inside. This does work better with going under both loops though, unless you like to have 2 sides whose stitches look slightly different. However, your colour motifs should show as that on both sides.
Often when you start, you would be making something like a bag and I would honestly not worry about how you do colour changes as no-one is going to see the inside. However, when you are new to this, and you look on the WS of your work....what do you see? Normally a rough outline of motifs but Arrrghhhh there are little dashes of your background colour appearing on them. Why why why?
Well, this is because in tapestry crochet you are instructed in a pattern to drop one colour and pick up the other. Remember though, patterns are an outline to a design they are not always tutorials on every single aspect. When you knit, a pattern might say CO 60 sts....and it wouldn't always tell you how to cast on. Same goes for writing tapestry crochet patterns, the pattern itself may not have the instructions for detail but the pattern notes might, and then a tech editor or magazine editor may cut that bit if there mag or book holds a technique section...or they may decide it is too obvious for their average reader.
Ok, I like obvious, and I totally understand the reasons why beginners need obvious! If you want to make sure you change yarns smoothly and leave no little blips and dashes behind then try this:
Say you are working with 2 yarns, Yarn A is your background and Yarn B is your motif.
1. On last dc before colour change,i.e. on the graph square just before the beginning of motif, pull Yarn A through as normal so there are 2 lps on hook.
Yarn B and any tail ends of other joinings, will be at front of work so as normal means putting hook under Yarn B & through the loop of dc, pick up yarn A pull back through lp and under Yarn B leaving 2 loops on hook
STOP for a second
2. Now pick up yarn A in your hand, and pull to front of work over the top of Yarn B, so that yarn A is now lying at front of work, and take Yarn B your new colour under yarn A so it is now lying along top of work ready to be picked up.
3. With hook (that stilll has 2 lps of yarn A) pick up yarn B and work a dc in next dc
STOP
4. Before continuing, have a look at the back of the work, you should see a completed stitch in your old colour Yarn A with no B visible there whatsoever, but the chain of the new colour is now over the top of the stitch of the new colour, colours should not be mingling on the same stitches.
5, One dc in next dc, with yarn B, you will see the black loop of the last stitch you made was actually the chain lying across the new stitch, so the last loop must ALWAYS match the colour of your next stitch.
Sounds complicated, but honestly this is easy.
Lastly, Tapestry crochet worked flat
Most crochet people seem to want to get the same smooth effect on one side, and they either swap hands and literally crochet backwards, or have developed a way of working backwards. Personally, I find this very difficult and have been cutting my yarns at the end of each row. This is mainly because I am not able to twist my wrist and cannot use my left hand for grippin anything.
One day i will make a video of these of my own, but do go to my YouTube channel which is slowly growing and has a vid tutorial from Carol Ventura on this technique plus others like Crafty Andy.
I thoroughly recommend Carol's website, http://www.tapestrycrochet.com
go there to see more of her videos showing tapestry flat, and in the rnd as well as links to her free patterns and opportunities to buy he wonderful books.
Colour work and graphing motifs
Now for some tips with colour work and tapestry crochet.To slant or not to slant
If you want to get a good outline and proportion to your motifs you can try crocheting your dc's (US sc's) into the back loop only, and on the RS only. This compensates for the normal 'slant' that you get. However, I like the slanted look that you get on some South American style and folk art pieces, for example look at these kitties on Carol Ventura's work, it would not look so traditional if it was not for the slant. See below for the graphs and a better explanation.
Normally this sort of crochet is done in the rnd, which means keeping to the RS only gives more even stitches and is a lot easier. If you are right handed you will be going around the piece clockwise and your motifs will slant to the right, if you are left handed then it is the opposite of this.Changing yarns
How to handle colour changes. Now this appears to be tricky if you are a knitter, but actually it doesn't take long for the brain to click into the rhythm of this.
On your last stitch of the old colour, stop when half way through with 2 lps on the hook, and pull through a strand of the new colour. The yarn which is not being used, is carried along the top of the work and you crochet around it giving a good padding to the stitches. 2 colours is best, but really there is not limit provided you can cover them. See below though, for perfecting this technique for double sided pieces
Help my yarn shows through??
Problems can occur, where crochet people tell me that the yarn being carried peeps through their work so does not look like Carol's wonderfully smooth surfaces. Normally the reason for this is that the people have used crochet before, and have associated e.g. a 4mm hook with DK, 5mm with Aran/worsted etc.
Forget all of this, just use a hook that makes stitches so tight, it definitely covers up the carried yarns and cannot move about easily. I recently made a little item for one of my books coming out later this year, sorry I can't show it yet! I will try to make another piece and load it up here, I used DK yarn and a 2.25 mm hook....even a 2mm hook might have been better. Obviously you need to choose a yarn that does not split easily so try mercerised cotton to begin with before a fluffy wool.
My motifs are leaning to one side!!
The other problems were that some motifs had edges which looked stepped, and others worked because they had already been designed with the slant in mind....aaah what's going on here?
Well if you have a motif that has a diagonal line slanting right, and you are right handed then if you crochet through BOTH lps you get a stepped effect, but if you crochet under the BACK lp only, you get a clean diagonal line.
Lots of artisan style crochet uses diamonds, or zig-zags where normally you would use pointed triangular shapes. If you want to know what a motif is likely to come out as with the both loops slanting method, then use Carol's special graph paper which can be downloaded from her website, http://www.tapestrycrochet.com
The kitty looks like this for right handers, Carol has graph paper for left handers too.
Then to help you work more easily, you can translate it back to a normal graph like this. If working both loops, you can compensate a bit for the leaning effect if you make your motifs lean in the opposite direction...e.g. if you are right handed, then motifs lean right....so you would make your legs on the kitty, or other motifs lean leftTriangles and Zig zagsCarol has a free pattern on her site for these hats (or bowls if you turn it upside down) and those triangular shapes, come out on a graph slightly differently than you would expect.
See how the triangle sides, have actually been worked in a straight line?
Work with it....not against it.
I just love the way that 'problems' are not things to be solved with artisan or folk art, and that it is the little anomalies that they work with to make traditional items that I love. I am more and more moving towards simplicity in design and colour work.....that seems to be my strength. I cannot tell you how many HUNDREDS of graphed artwork I have ranging from little tiny Fair Isle motifs up to more complicated pictorial stuff and Celtic knots and traditional motifs from fabric and textiles thrown in. Later in the year I will be opening these to the public and am working with someone else who is sympathetic to my design and also can present the ideas the way I would like them to be in public.
How your stitches affect drape (i.e. is it stiff or bendy)
Anyway, back to tapestry crochet. As well as working out how motifs will play out, i.e. slanting if working both loops in the direction of your hand (R or L hand) and being more or less square and stacked as graph paper if worked through the back loops only this affects the gauge, and hence the drape of the fabric.
Back loops = a softer fabric that drapes well - use for garments like hats, gloves, blankets or cloths and graph as normal
Both Loops = a sturdy stiff fabric with little drape, use for solid garments like slippers or boots or felted items, or use for pots, bowls, solid hats etc.
A Double side to it
The other effect I love about tapestry crochet, is the way you can make a pattern on the outside that is repeated on the inside. This does work better with going under both loops though, unless you like to have 2 sides whose stitches look slightly different. However, your colour motifs should show as that on both sides.
Often when you start, you would be making something like a bag and I would honestly not worry about how you do colour changes as no-one is going to see the inside. However, when you are new to this, and you look on the WS of your work....what do you see? Normally a rough outline of motifs but Arrrghhhh there are little dashes of your background colour appearing on them. Why why why?
Well, this is because in tapestry crochet you are instructed in a pattern to drop one colour and pick up the other. Remember though, patterns are an outline to a design they are not always tutorials on every single aspect. When you knit, a pattern might say CO 60 sts....and it wouldn't always tell you how to cast on. Same goes for writing tapestry crochet patterns, the pattern itself may not have the instructions for detail but the pattern notes might, and then a tech editor or magazine editor may cut that bit if there mag or book holds a technique section...or they may decide it is too obvious for their average reader.
Ok, I like obvious, and I totally understand the reasons why beginners need obvious! If you want to make sure you change yarns smoothly and leave no little blips and dashes behind then try this:
Say you are working with 2 yarns, Yarn A is your background and Yarn B is your motif.
1. On last dc before colour change,i.e. on the graph square just before the beginning of motif, pull Yarn A through as normal so there are 2 lps on hook.
Yarn B and any tail ends of other joinings, will be at front of work so as normal means putting hook under Yarn B & through the loop of dc, pick up yarn A pull back through lp and under Yarn B leaving 2 loops on hook
STOP for a second
2. Now pick up yarn A in your hand, and pull to front of work over the top of Yarn B, so that yarn A is now lying at front of work, and take Yarn B your new colour under yarn A so it is now lying along top of work ready to be picked up.
3. With hook (that stilll has 2 lps of yarn A) pick up yarn B and work a dc in next dc
STOP
4. Before continuing, have a look at the back of the work, you should see a completed stitch in your old colour Yarn A with no B visible there whatsoever, but the chain of the new colour is now over the top of the stitch of the new colour, colours should not be mingling on the same stitches.
5, One dc in next dc, with yarn B, you will see the black loop of the last stitch you made was actually the chain lying across the new stitch, so the last loop must ALWAYS match the colour of your next stitch.
Sounds complicated, but honestly this is easy.
Lastly, Tapestry crochet worked flat
Most crochet people seem to want to get the same smooth effect on one side, and they either swap hands and literally crochet backwards, or have developed a way of working backwards. Personally, I find this very difficult and have been cutting my yarns at the end of each row. This is mainly because I am not able to twist my wrist and cannot use my left hand for grippin anything.
One day i will make a video of these of my own, but do go to my YouTube channel which is slowly growing and has a vid tutorial from Carol Ventura on this technique plus others like Crafty Andy.
I thoroughly recommend Carol's website, http://www.tapestrycrochet.com
go there to see more of her videos showing tapestry flat, and in the rnd as well as links to her free patterns and opportunities to buy he wonderful books.


No comments:
Post a Comment